
|
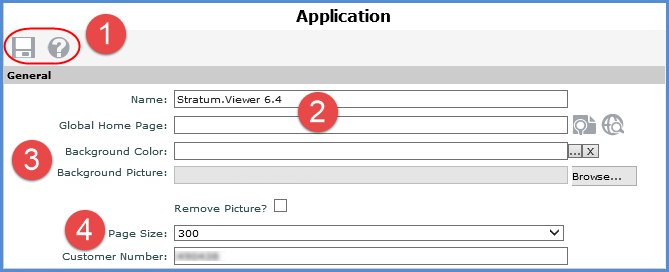
Toolbar -
|
|
Name - Use this field to customize the name that displays for the application in the browser title bar and tab. Global Home
Page - Use this setting to define a custom, global home
page for Stratum.Viewer. The home page can open to a web site,
document, directory, or other supplementary information that would
be meaningful for users. Use the Browse from File If you leave this field blank, the application home page defaults to a Stratum home page that has links to Stratum.Viewer videos and other resources. If needed, administrators can define different home pages for particular users or user groups through settings in the User Profile or User Profile Group windows. |
|
Background Color and Background Picture - Use these settings to control the background of the home page and grid area. Use the respective Browse buttons to browse to a color selection window or to browse to an image file. If you choose an image file, it will repeat as needed to fill up the size of the background area. To remove a background color, use the delete
button |
|
Page Size - This setting controls how many objects display per page in windows where lists of objects display. For example, the setting controls page size in the View list, User List, Role, Select Members, Select User, and Select User List Filter windows. There are many page sizes to choose from, as low as 25 or as high as 300 objects per page. Customer Number - This is a unique identification number for your Stratum.Viewer implementation that is defined by Silvon. |

|
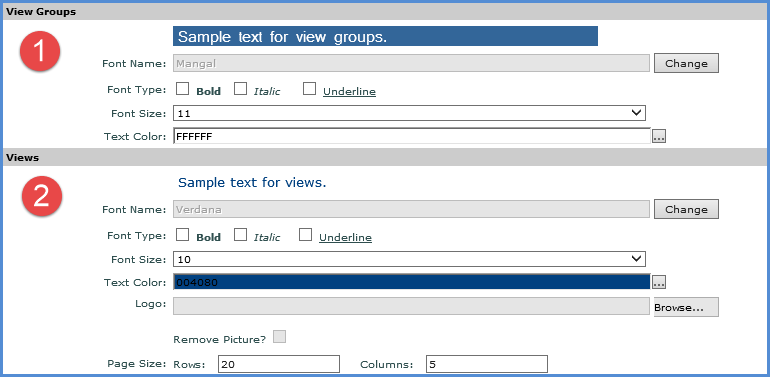
View Groups - This section controls the format of view group names in the left panel. You can customize the font style (name), type (Bold, Italic, Underline), size, and color. A preview of what the name will look like as you change the settings displays above the Font Name field. |
|
Views - The first few settings in this section control the format of view names in the left panel. You can customize the font style (name), type (Bold, Italic, Underline), size, and color. A preview of what the name will look like as you change the settings displays above the Font Name field. You can also specify an image to display as a logo in views. The image will display near the view name in the grid when users run views. Use the Browse button to browse to an image file. The file will be copied to the application folder. To remove a logo, select the Remove Picture? checkbox. The Page Size setting controls how many rows and columns display per page for views that are run in page mode (also known as collapsed mode). Enter a numeric value in the Rows and Columns fields. Security administrators can define different view page sizes for particular users through User Profile settings. Individual users can override administrator settings and define their own, custom view page sizes through an override setting in their User Options. |

|
Settings in the Measure Item Caption Expression section control the captions that will be assigned to new measure items created in views by default. Users can customize captions within each view if they prefer a caption other than the application default. If you change the application default, the captions of existing measure items will remain as is. Only new measures items added to views after your change will be assigned the new default. You can set up unique caption defaults for each type of measure item. The fields in this section are read only, but
you can click the Browse button
[Measure][From Period Short Desc] [From Year YYYY] to [To Period Short Desc] [To Year YYYY]
[Measure]
[Name] |

|
SMTP Server - This setting controls how Stratum.Viewer delivers the emails that it generates. The property defaults to a “localhost” value, in which case Stratum.Viewer emails will be delivered using the SMTP configurations for the server where Stratum.Viewer resides. If you plan to use an SMTP server other than the default for delivering Stratum.Viewer generated emails, enter that server name in the SMTP Server field. Enter the server name in a format that will be recognized by your network. For example, the server name or IP address or in the format of server name.network name.com. Note: If you are not sure which default SMTP server is used for the Stratum.Viewer server, access Microsoft Internet Information Services Manager on the server and look at the Default SMTP Virtual Server settings. |

|
This text controls the default subject prefix for emails of actions that results in no data exists cases. Those are cases where an Email action would result in no data to send to the designated user or a File Share action would result in no data in the resulting shared file. For example, if there are no rows and columns returned for a view that tracks excessive returns because no rows satisfy filter criteria of YTD Return Amount greater than $40,000. The prefix is only used when an action’s “Send Email when no Data Exists” property has been set to Yes and when no data exists. The prefix defined here will be used in the action email subject line before the rest of the Subject field text unless the user customized the prefix text for their specific action. Note: If a user sets an action’s “Send Email when no Data Exists” property to No and a no data case occurs, then no email will be generated by the action. |

|
The Planning Update
Format property controls the cell and text formatting that will
be applied in a measure item’s cell when planning updates are
made in a view. Click
the Browse button These administrative settings control the format of planning updates for all users. Security administrators can define different planning update formats for particular users through User Profile settings. Individual users can override administrator settings and define their own, custom planning format through an override setting in their User Options. Note: The Planning Update formats only apply to pending planning changes. For example, once you submit your planning changes and the grid refreshes, changed values will display in the same standard format as other values in the grid.
|

|
Microsoft SQL Server - The Bulk Insert settings are only relevant when the server for the Stratum.Viewer SQL Server database is different than the server for Stratum.Connector for Viewer. The settings pertain to a bulk insert process that is utilized during the Analysis Services database registration process. When master file tables are set up by the database registration process, a temporary delimited file and SQL Server Bulk Insert statement are used to transfer data from the Stratum.Connector for Viewer Analysis Services database to the master file tables in the Stratum.Viewer SQL Server database. If Stratum.Connector for Viewer (which handles the database registration process) and Stratum.Viewer are on different servers, you need to specify the Bulk Insert UNC Path. If they are on the same server, skip working with these settings.
Note: The initiator of the database registration processor -- whoever is logged on to the server and initiating the Stratum.Connector for Viewer process -- will need full access to the specified folder. If the initiator does not have full read and write permissions, the Bulk Insert file will not be accessible during the database registration process and the process will fail.
|
|
Microsoft Analysis Services -
|