
|
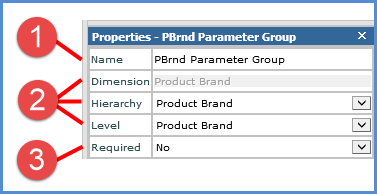
Name - Use to customize the name of a parameter group. Each group requires a unique name. The name will display above the group in the View Prompt window. |
|
Dimension, Hierarchy, and Level - Dimension field is read only and is updated as you make your Hierarchy selection. If a Hierarchy has more than one level, choose the level for the parameter group using the Level drop-down list. |
|
Required - If you want users of the view to be required to specify parameter values for the group before they can run the view, leave Required set to Yes. Otherwise you can change it to No and users will be able run the view without specifying any parameter values for the group. |

|
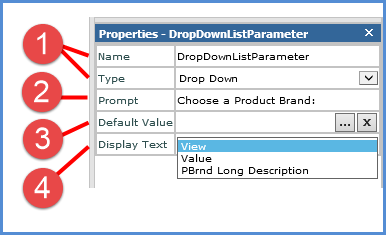
Name - Use to customize the name of a parameter. Each parameter across all parameter groups for the view requires a unique name. Don't use any spaces in the name. Type - Select the type of parameter. You can create up to four parameters per parameter group, one of each type.
|
|
Prompt - Enter a text prompt that instructs the user what to do with the parameter. The prompt will display next to the parameter's radio button in the View Prompt window. For example, you could enter text such as Choose a user list: for a user list parameter. Note: In order to activate a parameter and have it display in the View Prompt window, you need to enter a prompt. If you don't enter a prompt, you are required to specify a default value. |
|
Default Value - You have the option of specifying a default value for each parameter. The value displays in the View Prompt window where the user can either accept it or override it by choosing a different parameter value.
|
 |
Display Text – You have the option of customizing the Display Text property for the parameter. See How Parameter Display Text Interacts with Other Settings for more details and examples.
Note: Administrative settings in the Select Members Options window can override the parameter Display Text property. |