There are three tabs in this window, used to filter any part of your view. Click to see descriptions of each tab.
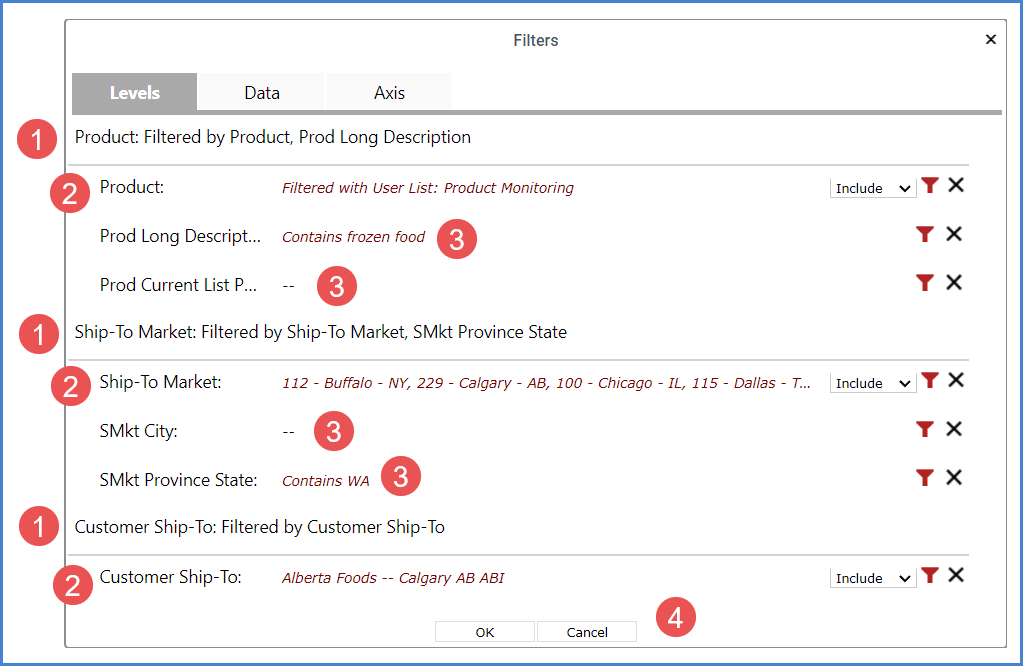
Levels can be filtered by their values and attributes. The first tab of the Filters window is for adding or editing those types of filters. Filter options are provided for level values and their individual attribute relationships in a view.
|
This tab is organized into sections for each level in a view except for hidden levels (those with Visible property set to No). The heading for each section includes the level caption and a summary of what filters exist.
Under each summary heading are the names of the level and attribute relationships displayed in the view for the level with their individual options to add, change, or remove their specific filters. More details follow about those features in this table’s sections 2 and 3. |
|
Sections for each level that shows in this tab include level value and attributes info. The value of the level displays as the first item under the level’s section heading in the window. The level name will be followed by details about any filtering applied to the level’s value.
If a level’s value filter information has a series of dots “…” at the end of it, click the dots to activate a cursor. This enables you to scroll right and see the rest of the filter details for the level. In this example, the dots for a filtered Ship-To Market level were clicked.
A cursor displays so you can scroll right and see the names of the rest of the members in the Ship-To Market member filter.
Each level has icons available for adding, changing, or clearing filters for the respective level plus a drop-down list for determining if the level value filter will be applied in the Include or Exclude mode.
|
|
The attribute relationships in a view, except hidden ones (those with Visible property set to No), will display within the section for their level in the Levels tab of the Filters window. They display after the level value filter info. Each attribute’s name will be followed by details about any filtering applied to that attribute. The filter operator followed by its value will display. Possible filter types are:
Dash marks “--" display next to attribute relationships that do not have a filter applied to them. This text also displays for cases where an attribute relationship is filtered but its level is not yet drilled to in the view at the time the Filters window was accessed. If an attribute relationship’s filter information has a series of dots “…” at the end of it, click the dots to activate a cursor. This enables you to scroll right and see the rest of the filter details. Each attribute relationship has icons available for adding, changing, or clearing filters for the respective attribute.
|
|
OK – Click OK to apply all the changes that you made in the Filters window. Changes made on any tabs will be applied to the view. Cancel – Click Cancel to close the window without applying your changes. |
|
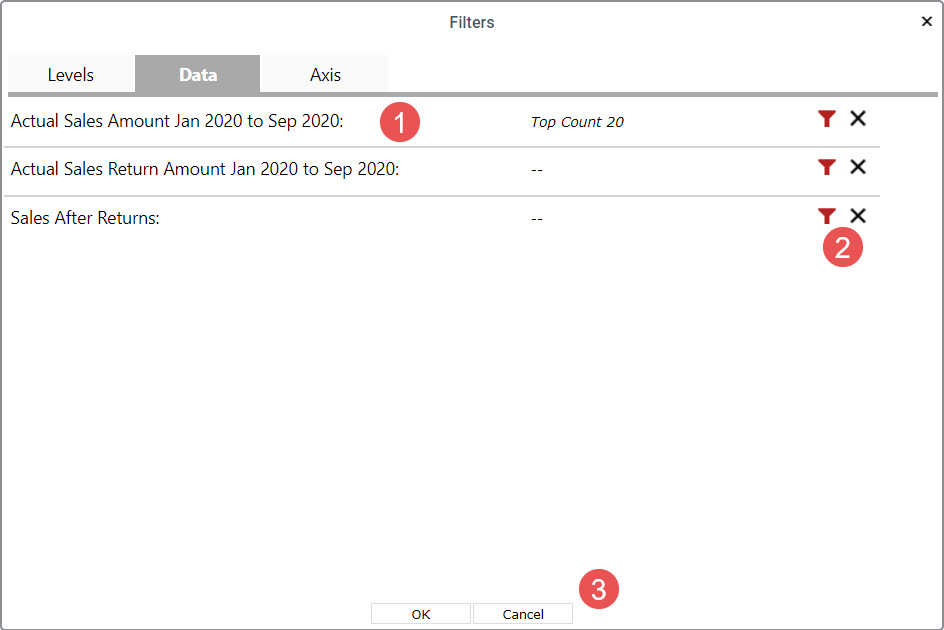
Each measure item included in the view will display in the Data tab of the Filters window. The measure item name will be followed by details about any filtering applied to the measure item.
|
|
Each measure item has icons available for adding, changing, or clearing filters for the respective measure item.
|
|
OK – Click OK to apply all the changes that you made in the Filters window. Changes made on any tabs will be applied to the view. Cancel – Click Cancel to close the window without applying your changes. |
|
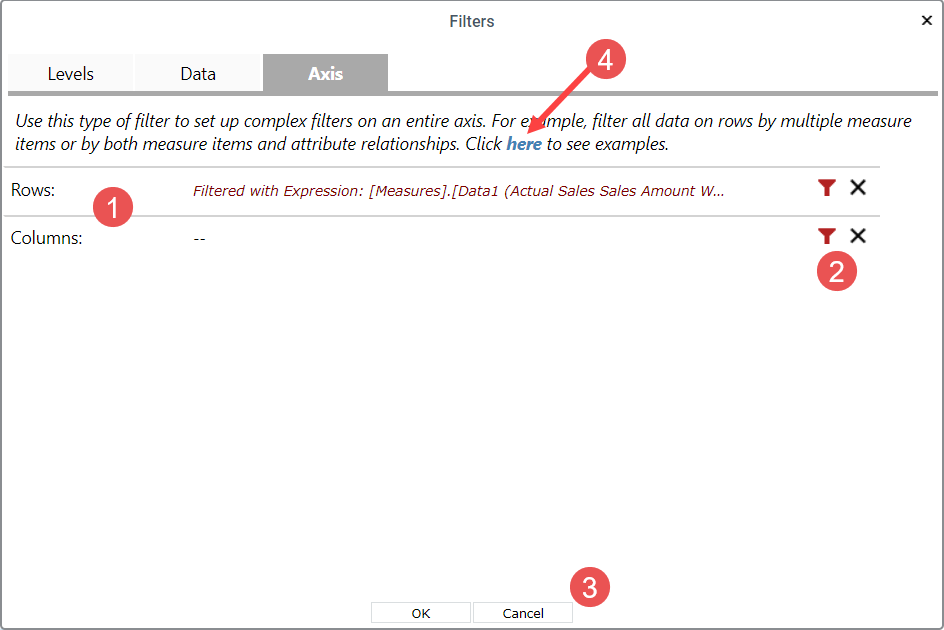
Set up filters on the rows or columns axis using the Axis tab. Use axis filters when you need to set up filters involving multiple measure items or both measure items and attribute relationships. For example, use an axis filter to return all rows that fit the criteria of two different measure items -- such as all rows where Sales Units are greater than 1,000 and Profit Margin is less than 20%.
If axis filter information has a series of dots “…” at the end of it, click the dots to activate a cursor. This enables you to scroll right and see the rest of the filter details for the axis.
|
|
Each axis has icons available for adding, changing, or clearing filters for the respective axis.
|
|
OK – Click OK to apply all the changes that you made in the Filters window. Changes made on any tabs will be applied to the view. Cancel – Click Cancel to close the window without applying your changes. |
|
|


 –
Click this icon to add or change filter selections or criteria.
When you are setting up a new level filter, the
–
Click this icon to add or change filter selections or criteria.
When you are setting up a new level filter, the 


