Action Maintenance Window

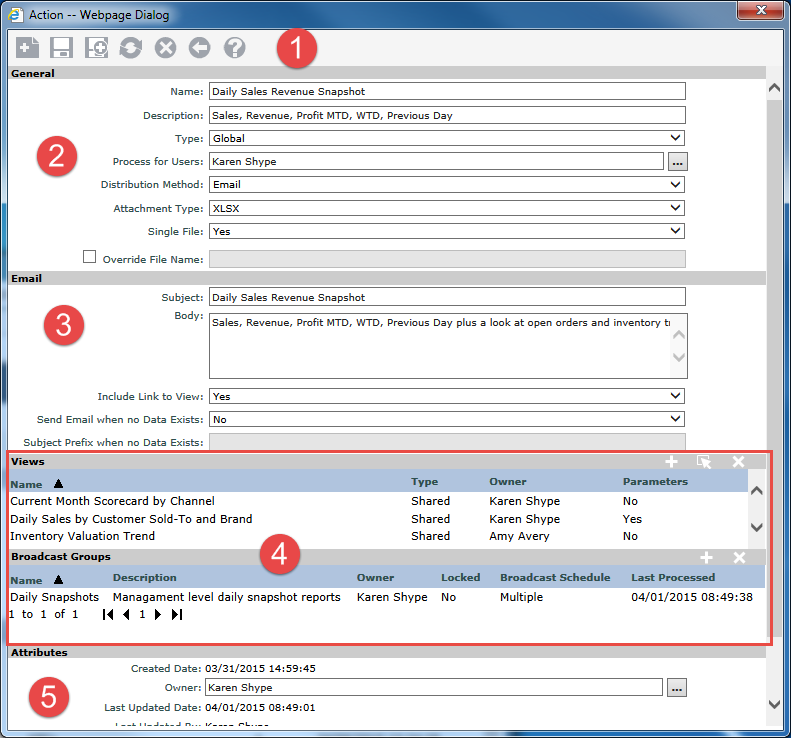
Action with Distribution method = Email

New   – Click to clear the Action Maintenance window and set up a new action.

Save  and Save As  – Use to save the current action or to perform a Save As to create a new action based on the current one. The Save button is disabled when advanced users are viewing global actions as they can only save their own personal actions.

Process  – Click to process the selected action. You will be prompted to continue with the process.

Delete  – Click to delete the selected action. You will be prompted to confirm the deletion. View and security administrators can delete any action. Advanced users can delete only their own personal actions.

Exit  – Click to close the window without making any changes and return to the window you were on. You will be prompted to continue without saving if the action has been modified.

Help Click to access help that is specific to actions.

General – Use this section to enter the action name and description and to determine if the action will be global or personal. The Type drop-down list will be disabled and default to Personal when advanced users are using the window.

  • Process for Users – Select the user(s) who will receive the results of this action by clicking the Browse button next to the Process for Users field. A User Selection window opens for that purpose. The action can be processed for one or more users, one or more Stratum.Viewer user profile groups, or a combination of individual users and groups.

  • Distribution Method – Actions can be distributed via email or written to a shared network location. To set up an Email action, choose Email for the distribution method. This means that the view results will be distributed via email. See the next section of this topic for File distribution method.

  • Attachment Type – Choose XLSX if you want the view results delivered as an Excel attachment to the email (recommended for larger views or when attaching multiple views to the action). Email actions with attachment type of XLSX create an email with an Open XML attachment(s) for the view(s) associated with the action. The Single File property described below and number of views attached determines how many files are created. Or choose Include as Text if you want the view results to display in the body of the email.

  • Single File – This property is enabled only when Attachment Type is set to XLSX. Indicate if you want a single file or multiple files created for the views attached to the action. If the Single File property is set to Yes, one file will be created with tabs for each view attached to the action. If the Single File property is set to No, a separate file will be created for each view.

  • Override File Name – This property is enabled only when Single File is set to Yes. The name of the attachment defaults to the action name plus the creation date. If you want to identify a different name, select the Override File Name checkbox and enter the desired file name.

Email – Use to set up properties for the emails that will be generated by the action, including subject and body text.

Include Link to View – Choose Yes if you want a link to each of the views associated with the action included in the body of the email. If you choose No, the link will be excluded.

Send Email when no Data Exists and Subject Prefix when no Data Exists – Choose Yes if you want an email generated to users even in cases where there is no data to send to a designated user. For example, if there are no rows and columns returned for a view that tracks excessive returns because no rows satisfy filter criteria of YTD Return Amount greater than $40,000. If you choose No, then no email is sent when no rows or columns exist in the view results for a user. If you choose Yes and no rows or columns exist in the view results for a user, the prefix defined in the Subject Prefix when no Data Exists field will be used in the email subject line before the rest of the Subject field text. Defining a prefix is optional.

Note: If multiple views are included in the action, all views associated with the action must return no data for the email to be sent.

Views – Multiple views can be associated with an action, and all views associated with the action are listed here. You can add and delete views and access action parameters.

  • Add Views  – From the Select View window, add views to the action.

  • Edit Parameters  – If view contains parameters, this button will be available to allow you to select the parameter values from the Action Parameters window.

  • Remove Views  – Remove the view from the action. You will need to confirm the removal.

Broadcast Groups – You can associate the action to the appropriate broadcast group(s).

  • Add Groups  – From the Select Broadcast Group window, add the action to one or more group(s).

  • Remove Groups  – Remove the action from the selected broadcast group. You will need to confirm the removal.

Attributes – This section shows the date the action was created, the owner of the action, last updated information, last processed information, and the action ID.

  • Created Date – The date and time the action was created. This field is display only.

  • Owner – Administrators can use the Owner property in this section to change the owner of an action. The property will be disabled when advanced users are using this window. Click the Browse button  to access the Select User window and make a selection.

  • Lasted Updated Date / Last Updated By – The first and last name of the user that last updated the action and the date the action was updated. This field is display only.

  • Last Processed Date / Last Processed By – The first and last name of the user that last processed the action and the date the action was last processed. When an action is processed in batch, the Last Process By will be “Batch”. This field is display only.

  • Action ID – This is the ID for the action and is automatically generated by Stratum.Viewer. This field is display only.

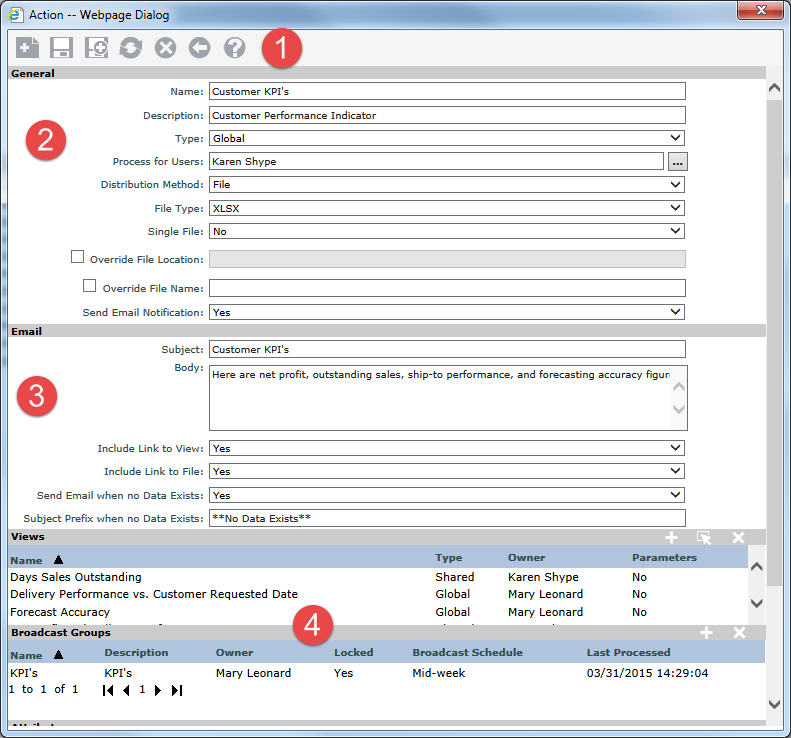
Action with Distribution method = File

New   – Click to clear the Action Maintenance window and set up a new action.

Save  and Save As  – Use to save the current action or to perform a Save As to create a new action based on the current one. The Save button is disabled when advanced users are viewing global actions as they can only save their own personal actions.

Process  – Click to process the selected action. You will be prompted to continue with the process.

Delete  – Click to delete the selected action. You will be prompted to confirm the deletion. View and security administrators can delete any action. Advanced users can delete only their own personal actions.

Exit  – Click to close the window without making any changes and return to the window you were on. You will be prompted to continue without saving if the action had been modified.

Help   Click to access help that is specific to actions.

General – Use this section to enter the action name and description and to determine if the action will be global or personal. The Type drop-down list will be disabled and default to Personal when advanced users are using the window.

  • Process for Users – Select the users who will receive the results of this action by clicking the Browse button  next to the Process for Users field. A User Selection window opens for that purpose. The action can be processed for one or more users, one or more Stratum.Viewer user profile groups, or a combination of individual users and groups.

  • Distribution Method – Actions can be distributed via email or written to a shared network location. To set up a File action, choose File for the distribution method. This means that the view results will be saved to a shared network location and users will be notified by email when the results are available. See the previous section of this topic for Email distribution method.

  • File Type – File distribution method actions default to XLSX type and cannot be changed.

  • Single File – Indicate if you want a single file or multiple files created for the views attached to the action. If the Single File property is set to Yes, one XLSX file will be created with tabs for each view attached to the action. If the Single File property is set to No, a separate file will be created for each view.

  • Override File Location – This property is enabled only when a single recipient has been selected for an action. The file(s) for the recipient will be written to the location specified by their Stratum.Viewer user profile unless you use this property to identify a different location. If you want to identify a different location, select the Override File Location checkbox and enter the desired file location. An override file location is only allowed when there is a single recipient for the action. The location you specify must exist already and be one that the intended recipient has access rights. You can only override the file share location for a recipient if you have the same or more data rights than the recipient.

  • Override File Name –The name of the file created by the action defaults to the action name plus the creation date. If you want to identify a different name, select the Override File Name checkbox and enter the desired file name. An override files name is only allowed when Single File = Yes.

  • Send Email Notification – If an email notification is being sent, the Email section below is enabled.

Email – This section is only enabled when the Send Email Notification property is set to Yes. Use the section to set up properties for the emails that will be generated each time the File action is processed, including the subject and body text.

Include Link to View – Choose Yes if you want a link to each of the views associated with the action included in the body of the email. If you choose No, the link will be excluded.

Include Link to File – Choose Yes if you want a link to the Excel file(s) included in the body of the email. If you choose No, the link will be excluded.

Send Email when no Data Exists and Subject Prefix when no Data Exists – Choose Yes if you want an email generated to the user in cases where there will be no data in the resulting shared file. If you choose No, then no email will be generated for no data cases. If you choose Yes and a no data case occurs, the prefix defined in the Subject Prefix when no Data Exists field will be used in the email subject line before the rest of the Subject field text. Defining a prefix is optional.

Note: If multiple views are included in the action, all views associated with the action must return no data for the email to be sent.

Views – Multiple views can be associated with an action, and all views associated with the action are listed here. You can add and delete views and access action parameters.

  • Add Views  – From the Select View window, add views to the action.

  • Edit Parameters  – If view contains parameters, this button will be available to allow you to select the parameter values from the Action Parameters window.

  • Remove Views  – Remove the view from the action. You will need to confirm the removal.

Broadcast Groups – You can associate actions to multiple broadcast groups.

  • Add Groups  – From the Select Broadcast Group window, add the action to one or more group(s).

  • Remove Groups  – Remove the action from the selected broadcast group. You will need to confirm the removal.